Introduction
Macs keep their installation and recovery partitions so when needed, users can comfortably restore OS X back to default. However when hard drive malfunctions and is replaced, you will also lose this recovery partition. Mac also contains recovery option in its UEFI and it is able to download installation packages through Internet, but if you have problems with Internet connection (slow connection, WEP security on WiFi), the USB bootable flash drive is the best alternative how to restore your system.
The fastest way how to restore the system is to use a bootable installation flash drive and this article will show you how to create such installation disk with OS X 10.10 Yosemite.
Three ways how to create OS X USB installation drive:
- Easiest way how to create installation USB flash drive with createinstallmedia tool
- How to create installation USB flash drive with Terminal
- How to create installation USB flash drive with Disk Utility and Finder
Preparation - get OS X Yosemite installer and USB flash drive
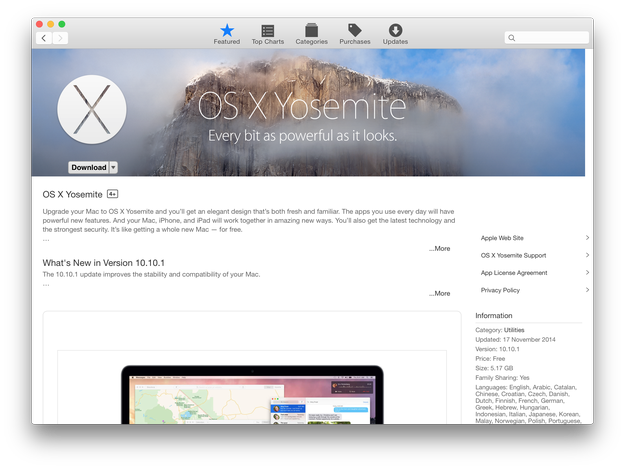
First you need to have Yosemite installer (Install OS X Yosemite.app in Applications folder). If you don't have the installer in Applications folder, you can download it from Mac App Store.
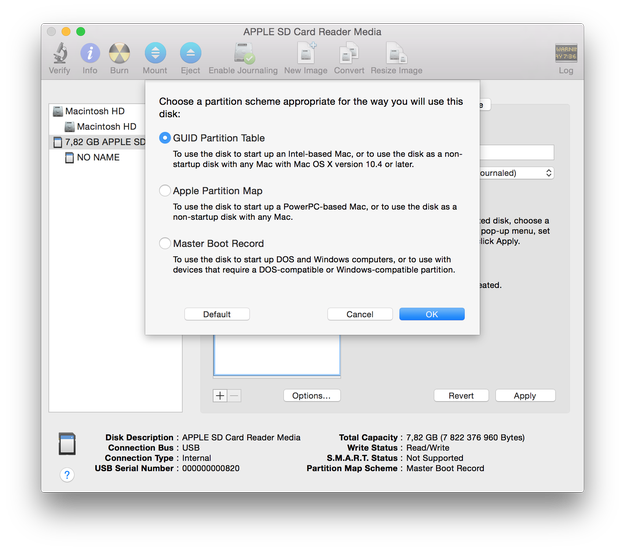
Also you need flash drive with at least 8 GB capacity, formatted with a GUID Partition Table which is named Untitled by default like is shown on our screenshot. You can of course rename it to whatever you need but you will then need to alter the commands accordingly.
To boot from flash drive you need to press and hold Option (ALT) Key on keyboard through boot up the Mac.
How to create installation USB drive with createinstallmedia tool
The createinstallmedia is a command line tool integrated to OS X Yosemite installer. It is the easiest way how to create USB installation flash disk with OS X Yosemite.
Open the Disk Utility and format flash drive with a GUID Partition Table and check it out in the Finder if Install OS X Yosemite.app is in your /Applications folder.
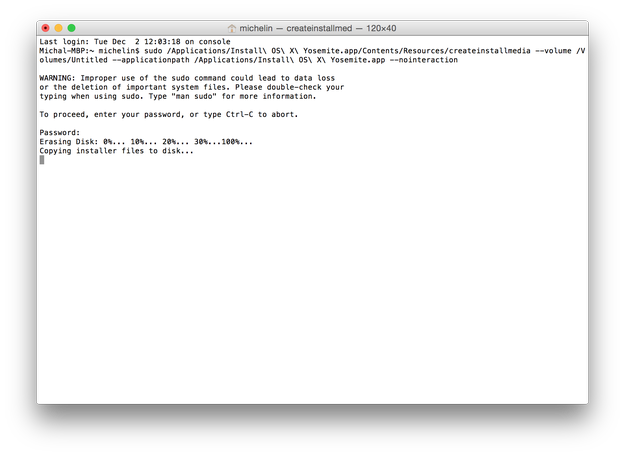
Now open the Terminal and type the following command:
sudo /Applications/Install\ OS\ X\ Yosemite.app/Contents/Resources/createinstallmedia --volume /Volumes/Untitled --applicationpath /Applications/Install\ OS\ X\ Yosemite.app --nointeraction
In our case "Untitled" is the name of USB flash drive! Replace "Untilled" by name of your flash drive.
Wait a few minutes and your Yosemite installation USB drive will be prepared.
To install OS X Yosemite ► restart computer ► hold the Option key and select Installation USB drive from the menu.
How to create installation USB drive with Terminal commands
Format your USB flash drive with a GUID Partition Table and named it Untitled. Download Install OS X Yosemite.app from App Store, if you do not have it your /Applications folder already.
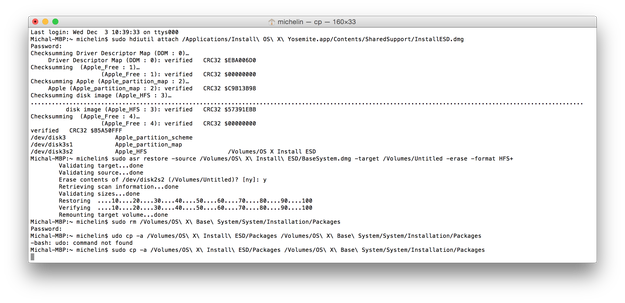
Open Terminal and type the following sequence of commands:
sudo hdiutil attach /Applications/Install\ OS\ X\ Yosemite.app/Contents/SharedSupport/InstallESD.dmg
sudo asr restore -source /Volumes/OS\ X\ Install\ ESD/BaseSystem.dmg -target /Volumes/Untitled -erase -format HFS+
sudo rm /Volumes/OS\ X\ Base\ System/System/Installation/Packages
sudo cp -a /Volumes/OS\ X\ Install\ ESD/Packages /Volumes/OS\ X\ Base\ System/System/Installation/Packages
sudo cp -a /Volumes/OS\ X\ Install\ ESD/BaseSystem.chunklist /Volumes/OS\ X\ Base\ System
sudo cp -a /Volumes/OS\ X\ Install\ ESD/BaseSystem.chunklist /Volumes/OS\ X\ Base\ System
sudo cp -a /Volumes/OS\ X\ Install\ ESD/BaseSystem.dmg /Volumes/OS\ X\ Base\ System
hdiutil detach /Volumes/OS\ X\ Install\ ESD
Now wait until your bootable installation flash drive with OS X 10.10 Yosemite is prepared.
To install OS X Yosemite ► restart computer ► hold the Option key and select Installation USB drive from the menu.
How to create installation USB drive with Disk Utility and Finder
Some files that you need to create USB flash drive is hidden. To view hidden files in Finder open terminal and use command:
defaults write com.apple.finder AppleShowAllFiles 1 && killall Finder
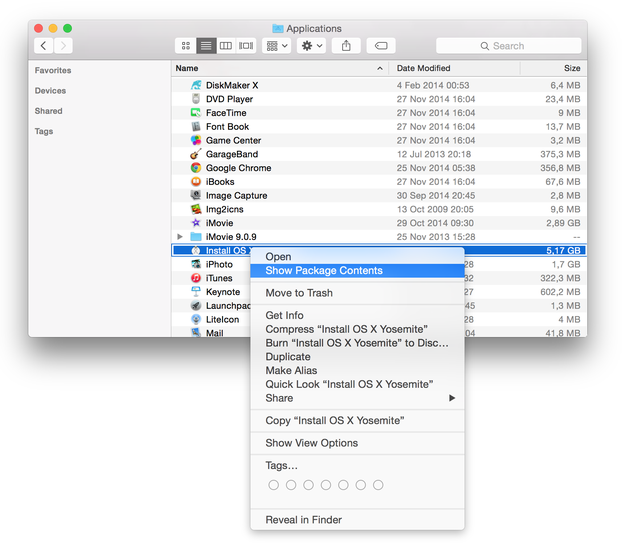
Open Finder ► Applications ► Install OS X Yosemite.app ► right click ► Select Show Package Contents option.
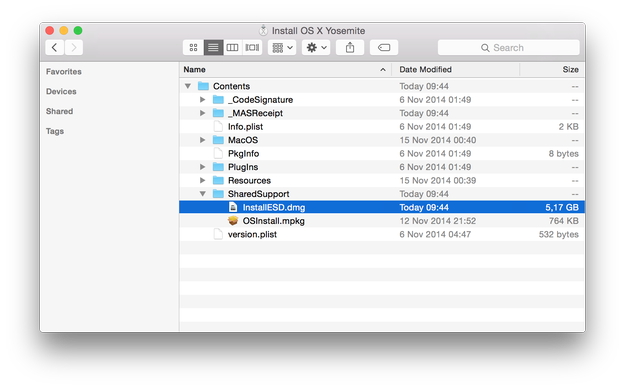
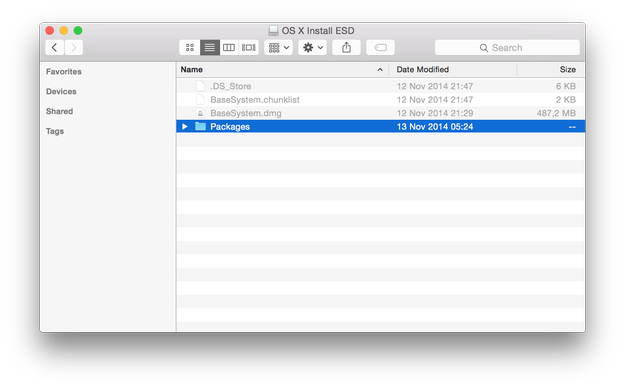
Navigate to Contents/SharedSupport ► Mount InstallESD.dmg file
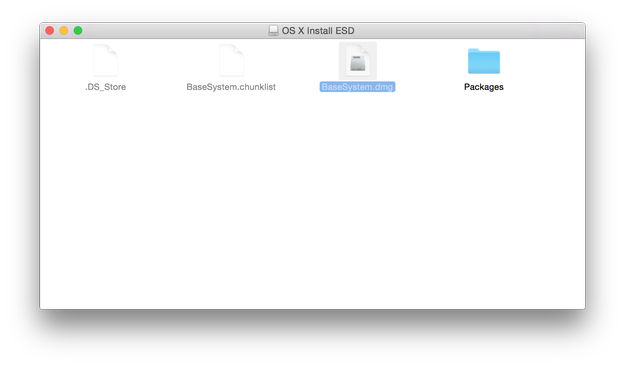
Open OS X Install ESD archive in Finder and mount BaseSystem.dmg archive
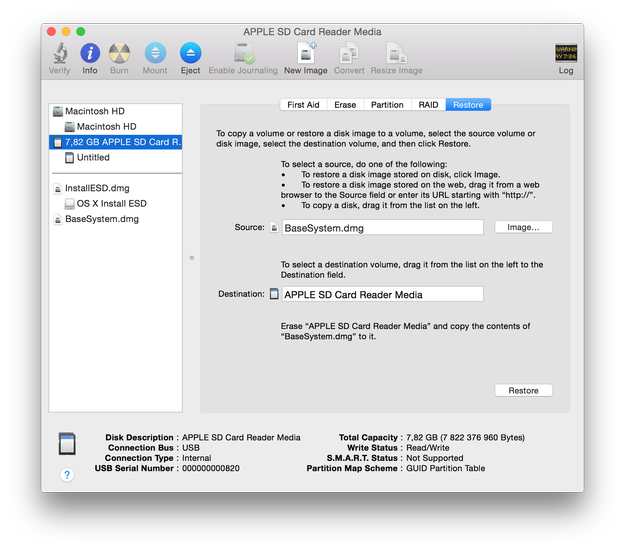
Connect USB drive and open Disk Utility (/Applications/Utilities)
Select the USB drive from the list of disks, select Restore option and pick Select OS X Base System archive as a source and USB flash drive as the destination. When ready click on Restore button.
After the Restore process is finished, open Finder ► open USB drive (OS X Base System) ► go to the System/Installation folder and select Packages file and delete it.
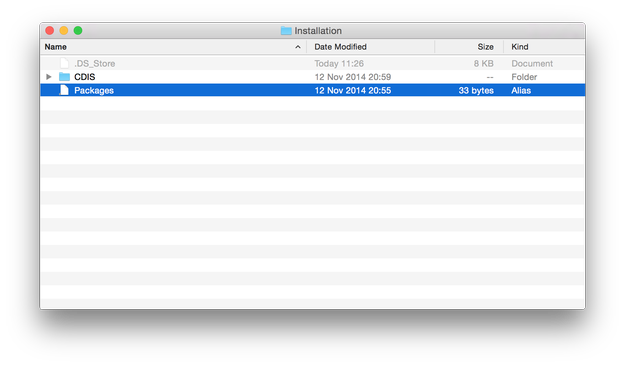
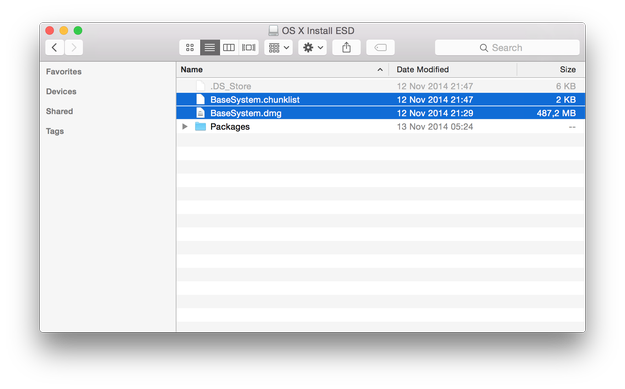
Open OS X Install ESD volume in Finder, select Packages folder and copy them to System/Installation folder on USB drive.
Also copy BaseSystem.chunklist and BaseSystem.dmg files from InstallESD.dmg volume to root of USB flash drive (OS X Base System).
Now your Yosemite installation USB drive is prepared and ready for use.
To install OS X Yosemite ► restart computer ► hold the Option key and select Installation USB drive from the menu.

