
 Language
Related extensions:
![]() Microsoft Virtual PC is virtualization software for Microsoft Windows. It is available for free to download on Microsoft websites and also is a part of Microsoft Windows 7 used to run Windows XP mode for compatibility with old applications.
Microsoft Virtual PC is virtualization software for Microsoft Windows. It is available for free to download on Microsoft websites and also is a part of Microsoft Windows 7 used to run Windows XP mode for compatibility with old applications.
Virtual PC is designed for common users of Windows. It contains only basic options for physical machine and operating system emulation.
VMware Workstation is virtualization software for advanced users with detailed settings of emulation as well as supports to run Unix and Unix based operating systems (Mac OS X, Linux).
Virtual PC uses its own virtual disk image format called Virtual Hard Disk (.vhd file extension) that stores file system, operating system data, users files and folders like on physical disk. VHD format is also used by Microsoft backup applications and Windows Server operating systems.
How to run Virtual PC virtual machine in VMware Workstation
Now we will introduce you how to easily open Virtual PC virtual machine in VMware Workstation version 8 and latter.
Start VMware Workstation. Go to the File menu → New Virtual Machine... option. VMware will open New Virtual Machine Wizard.
Select Custom (advanced) option → Click on Next button to open the next step of the wizard.

VMware Workstation 8 virtual machine wizard
In other step set Virtual Machine compatibility to Workstation 8 and click on Next button.

VMware Workstation 8 compatibility settings
Go through other wizard steps to set of operating system installation (set install OS later option), installed operating system on VHD, Virtual Machine name, processor type, memory size, network type etc. until you step on Select a Disk option.
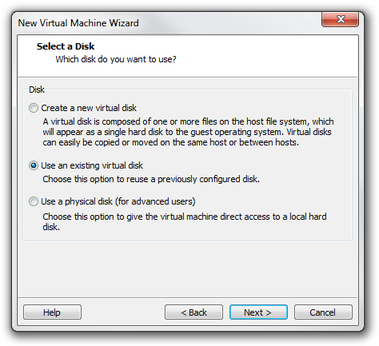
VMware Workstation 8 disk settings
Now select Use an existing virtual disk option > click on Next button. Click on Browse... button. In file type option above Open / Cancel buttons and select All files (*.*) option.
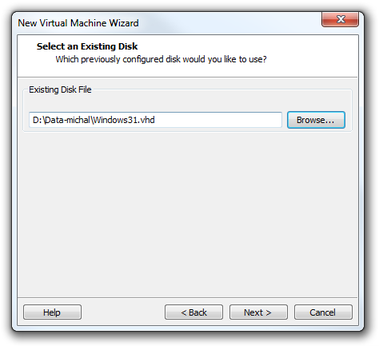
VMware Workstation 8 select VHD disk
Browse to directory, where the VHD file is stored. Click on it and click on Open button.
Click on Next button to wizard summary window → Click on Finish button.

VMware Workstation 8 summary window
Now your virtual machine with Virtual PC hard disk is prepared to use. Click on Power on this virtual machine option to run it.
How to convert Virtual PC to VMware Workstation
Conversion of Virtual PC virtual machine is useful for common users that have only basic knowledge about VMware and owners of older VMware Workstation releases.
Virtual PC machines can be easy converted to VMware with vCenter Converter Standalone. It is available on VMware website for free.
VMware vCenter Converter Standalone
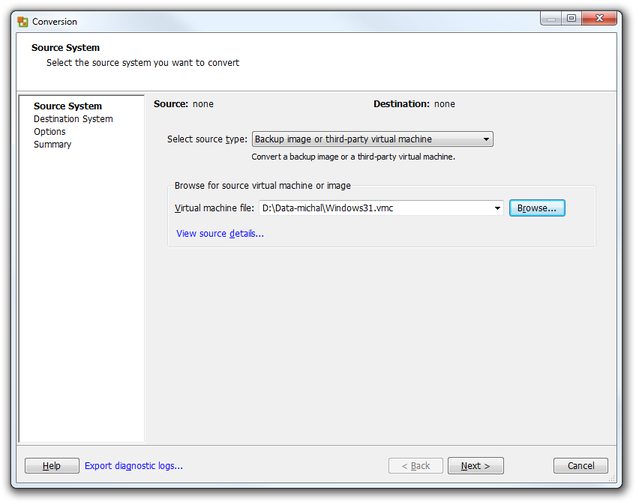
Download and install vCenter Converter Standalone. Start the application. To convert Virtual PC machine you will need Virtual Hard Disk file (.vhd file extension) and Virtual PC settings file (.vmc file extension).
Click on Convert Machine icon. Select source type on Backup image or third-party virtual machine. Click on Browse... button. In Open window browse to Virtual machine folder and select VMC file and click on Open button. Click Next button.
VMware vCenter Converter Standalone select source system
Set the name of a new virtual machine, compatibility with VMware products and location on hard disk. Click Next button.
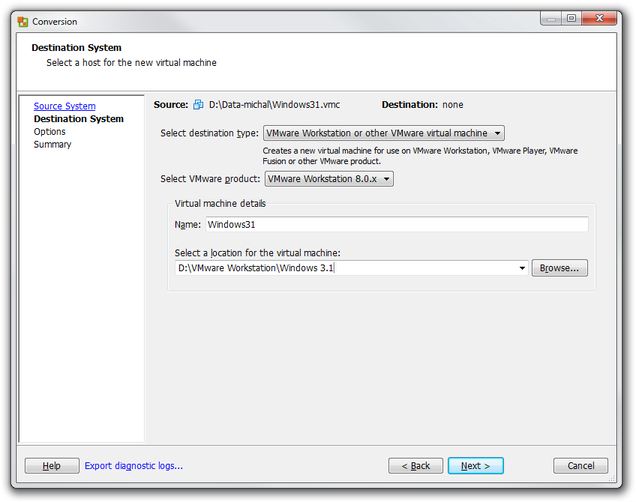
VMware vCenter Converter Standalone destination system
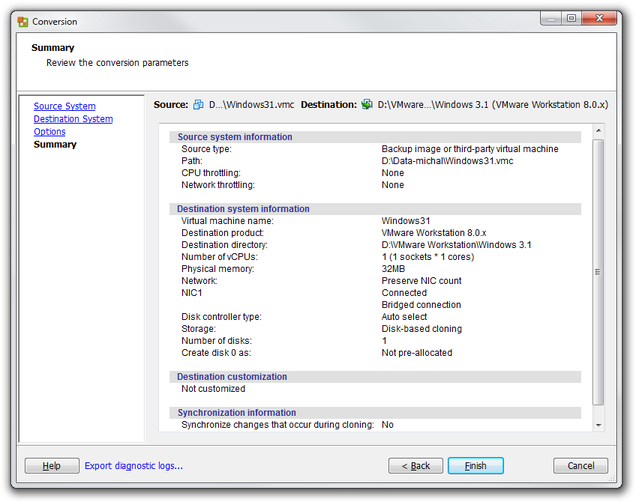
In Options you can customized virtual computer settings. After you finished the customizing, click Next button and on the last Summary step of wizard click Finish button.

VMware vCenter Converter Standalone options
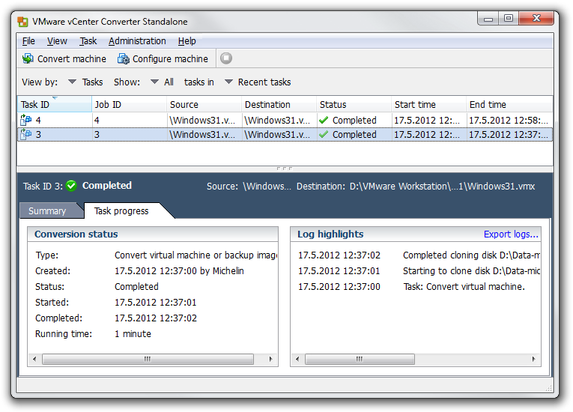
Now wait until the conversion is finished. The converting time depends on size of Virtual PC machine and type of operating system.
After the conversion task is completed, start VMware Workstation, or VMware Player and run new VMware virtual machine from location that you set bellow.